openstack Glance镜像服务迁移
本文由老男孩教育40期学员侯召顺整理
迁移的目的
将glance服务迁移到其他节点上,减轻控制节点压力,提高性能。
1)数据库迁移
本次glance迁移到compute2节点上
安装数据库
yum -y install mariadb mariadb-server python2-PyMySQL
修改数据库配置文件
[root@compute2 ~]# vim /etc/my.cnf.d/openstack.cnf
[mysqld]
bind-address = 10.0.0.32
default-storage-engine = innodb
innodb_file_per_table
max_connections = 4096
collation-server = utf8_general_ci
character-set-server = utf8
启动数据库,并设置开机自启动
systemctl enable mariadb.service
systemctl start mariadb.service
【重要】为了保证数据库服务的安全性,运行``mysql_secure_installation``脚本
mysql_secure_installation
2) 镜像glance 数据库迁移
在控制节点的数据库将glance库导出,文件传到计算节点
[root@controller ~]# mysqldump -B glance > glance.sql
[root@controller ~]# rsync -avz glance.sql 10.0.0.32:/opt/
以下操作在compute2节点上进行操作
导入数据库:
[root@compute2 ~]# mysql
MariaDB [(none)]> source /opt/glance.sql
重新创建glance授权用户
GRANT ALL PRIVILEGES ON glance.* TO 'glance'@'localhost' IDENTIFIED BY 'GLANCE_DBPASS';
GRANT ALL PRIVILEGES ON glance.* TO 'glance'@'%' IDENTIFIED BY 'GLANCE_DBPASS';
3) 安装glance服务
参考文档https://docs.openstack.org/mitaka/zh_CN/install-guide-rdo/glance.html
安装glance相关软件包
yum -y install openstack-glance
#编辑配置文件 /etc/glance/glance-api.conf
yum install openstack-utils -y
cp /etc/glance/glance-api.conf{,.bak}
grep '^[a-Z\[]' /etc/glance/glance-api.conf.bak >/etc/glance/glance-api.conf
openstack-config --set /etc/glance/glance-api.conf database connection mysql+pymysql://glance:GLANCE_DBPASS@10.0.0.32/glance
openstack-config --set /etc/glance/glance-api.conf glance_store stores file,http
openstack-config --set /etc/glance/glance-api.conf glance_store default_store file
openstack-config --set /etc/glance/glance-api.conf glance_store filesystem_store_datadir /var/lib/glance/images/
openstack-config --set /etc/glance/glance-api.conf keystone_authtoken auth_uri http://controller:5000
openstack-config --set /etc/glance/glance-api.conf keystone_authtoken auth_url http://controller:35357
openstack-config --set /etc/glance/glance-api.conf keystone_authtoken memcached_servers controller:11211
openstack-config --set /etc/glance/glance-api.conf keystone_authtoken auth_type password
openstack-config --set /etc/glance/glance-api.conf keystone_authtoken project_domain_name default
openstack-config --set /etc/glance/glance-api.conf keystone_authtoken user_domain_name default
openstack-config --set /etc/glance/glance-api.conf keystone_authtoken project_name service
openstack-config --set /etc/glance/glance-api.conf keystone_authtoken username glance
openstack-config --set /etc/glance/glance-api.conf keystone_authtoken password GLANCE_PASS
openstack-config --set /etc/glance/glance-api.conf paste_deploy flavor keystone
#编辑配置文件 /etc/glance/glance-registry.conf
cp /etc/glance/glance-registry.conf{,.bak}
grep '^[a-Z\[]' /etc/glance/glance-registry.conf.bak > /etc/glance/glance-registry.conf
openstack-config --set /etc/glance/glance-registry.conf database connection mysql+pymysql://glance:GLANCE_DBPASS@10.0.0.32/glance
openstack-config --set /etc/glance/glance-registry.conf keystone_authtoken auth_uri http://controller:5000
openstack-config --set /etc/glance/glance-registry.conf keystone_authtoken auth_url http://controller:35357
openstack-config --set /etc/glance/glance-registry.conf keystone_authtoken memcached_servers controller:11211
openstack-config --set /etc/glance/glance-registry.conf keystone_authtoken auth_type password
openstack-config --set /etc/glance/glance-registry.conf keystone_authtoken project_domain_name default
openstack-config --set /etc/glance/glance-registry.conf keystone_authtoken user_domain_name default
openstack-config --set /etc/glance/glance-registry.conf keystone_authtoken project_name service
openstack-config --set /etc/glance/glance-registry.conf keystone_authtoken username glance
openstack-config --set /etc/glance/glance-registry.conf keystone_authtoken password GLANCE_PASS
openstack-config --set /etc/glance/glance-registry.conf paste_deploy flavor keystone
4) 迁移原有镜像文件
将原glance上的镜像文件,传输到compute2。
[root@controller ~]# cd /var/lib/glance/images/
[root@controller ~]# rsync -avz `pwd`/ 10.0.0.32:`pwd`/
【注意权限】传输过后,在compute2上查看权限
[root@compute2 ~]# cd /var/lib/glance/images/
[root@compute2 ~]# chown glance:glance *
5) 修改现有keystone中 glance服务注册信息
备份数据库endpoint表数据
[root@controller ~]# mysqldump keystone endpoint > endpoint.sql
修改keystone注册信息
cp endpoint.sql{,.bak}
sed -i 's#http://controller:9292#http://10.0.0.32:9292#g' endpoint.sql
重新将修改后的sql文件导入数据库
[root@controller ~]# mysql keystone < endpoint.sql
6) 修改nova节点配置文件
将所有的节点上的配置文件都进行修改
sed -i 's#api_servers = http://controller:9292#api_servers = http://10.0.0.32:9292#g' /etc/nova/nova.conf
控制节点重启
systemctl restart openstack-nova-api.service openstack-nova-consoleauth.service openstack-nova-scheduler.service openstack-nova-conductor.service openstack-nova-novncproxy.service
计算节点重启
systemctl restart openstack-nova-compute.service
停掉glance原节点的服务
systemctl stop openstack-glance-api.service openstack-glance-registry.service
7) 验证操作
在copmute2节点启动glance服务
systemctl start openstack-glance-api.service openstack-glance-registry.service
查看镜像列表
[root@controller ~]# openstack image list
+--------------------------------------+----------+--------+
| ID | Name | Status |
+--------------------------------------+----------+--------+
| 68222030-a808-4d05-978f-1d4a6f85f7dd | clsn-img | active |
| 9d92c601-0824-493a-bc6e-cecb10e9a4c6 | cirros | active |
+--------------------------------------+----------+--------+
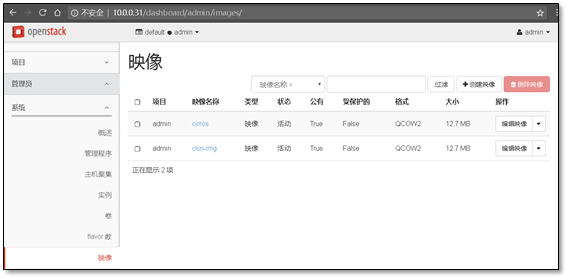
查看web界面中的镜像信息


评论已关闭